Volenfell is the fourth 4-man group dungeon for the Daggerfall Covenant in Elder Scrolls Online, and is located in eastern Alik’r Desert. The bosses in the dungeon are level 37, and the normal mode of the dungeon is tuned to players between level 35 and 36.
The other alliances can run through Volenfell after first completing their own level 35-36 dungeons: Tempest Island and Direfrost Keep.
This guide explains the boss fights of Volenfell in detail, and provides strategies for defeating the bosses.
Volenfell Overview
Volenfell is a neat Dwarven ruin filled with beasts and treasure hunter bandits. There’s a couple of very nice boss fights in this dungeon.
Volenfell has its own story and quest, which also rewards a skill point for completing it.
Recommended Group setup
Going with the standard tank+healer+2 dps is a safe bet. Most of the damage is avoidable, but first timers will find a healer helpful.
Normal Mode
Bosses
- Desert Lion (miniboss)
- Quintus Verres
- Boilbite (miniboss)
- Tremorscale
- Unstable Construct (miniboss)
- The Guardian Council
Desert Lion
Level: 37
Health: 10,830
Desert Lion is the first miniboss in Volenfell. Calling the lion a miniboss is really an insult – he’s a 0-star miniboss and is a complete pushover.
Boss mechanics
- Desert Lion pulls with three lion adds. Taking them out is probably the biggest “challenge” in this fight.
- The only ability Desert Lion himself has is his AOE fear. He periodically casts a fear on everyone in the group. It’s unavoidable, but you can break free from it with Stamina.
Quintus Verres
Level: 37
Health: 45,496
Quintus Verres is the second boss in Volenfell. This is a proper boss fight with multiple phases.
Boss mechanics
- The fight begins after you kill a group of treasure hunters. Quintus will appear.
- Quintus has a heavy melee attack which should be blocked.
- Quintus casts a whirlwind around him. He also does it on the move. The tank can do two things: either stand still and block the whirlwind, or run away from it.
- Phase 2 of the fight begins when Quintus runs to a couple of crates and picks up a fire staff. He doesn’t seem to respond to taunts in this phase, and randomly attacks players with fire attacks.
- In this phase Quintus places patches of fire on the ground. Needless to say, don’t stay in them.
- Quintus also gains a fire spirit/dragon ability, which is casted at a random player. The animation is pretty flashy, but the ability only seems to fear the player.
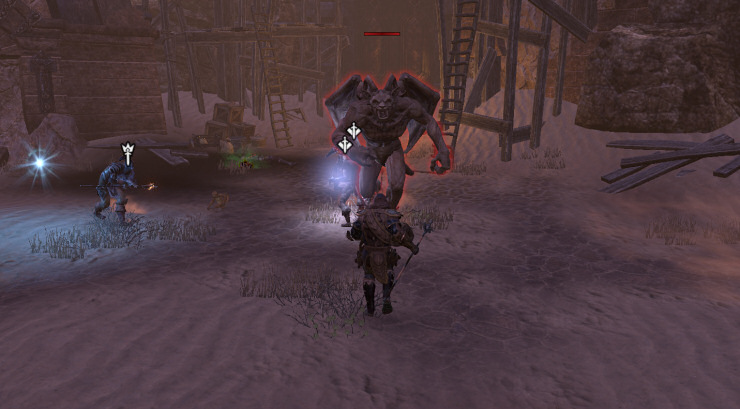
- Phase 3 begins when Quintus hits roughly 20% Health. He runs to channel a cast at a stone gargoyle, animating it. The Monstrous Gargoyle has 25,992 Health and has unique abilities.
- The Monstrous Gargoyle does a massive frontal cone fear/petrify at random targets. The area of effect of this ability really is massive, and unless you’re spread out, there’s a good chance that everyone apart from the tank will get hit by it. You’ll be petrified in place for maybe 5 seconds.
- The Gargoyle also stops to smash the ground beneath him, dealing lots of AOE damage in pulses.
Boilbite
Level: 37
Health: 14,440
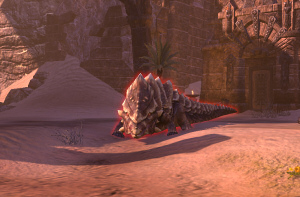
Boilbite is the third boss in Volenfell. Boilbite is a giant beetle and is surrounded by a number of smaller beetles, who should be killed asap.
Boss mechanics
- Boilbite does an AOE fire attack around him. The damage comes in pulses, and every pulse expands the radius of the AOE circle. This ability really hurts and could easily kill you if you fail to get out of it in time.
- Boilbite likes to blink behind the tank. If this ability does something apart from causing general confusion, I’m not aware of it.
Tremorscale
 Level: 37
Health: 25,992
Tremorscale is the fourth boss in Volenfell. You can avoid almost all of the damage in this fight.
Boss mechanics
- Tremorscale does a frontal cone tail swipe at the tank. You can try to get out of it, but it can also be just blocked.
- Tremorscale periodically burrows under the ground and shortly after re-appears at the same spot, dealing lots of AOE damage in a small radius around the location. This is easy to avoid – just move away from his melee range when you see the burrow animation.
Unstable Construct
Level: 37
Health: 14,440
Unstable Construct is the fifth boss in Volenfell. He (it?) is a dwarven sentry, and there can be a surprising amount of damage in this fight.
He’s surrounded by a bunch of dwemer spiders who should be killed before focusing on him.
Boss mechanics
- First of all, the room and the corridor leading to the room is full of traps. Watch out.
- Unstable Construct periodically charges at targets, dealing some physical damage in the process.
- The boss has an explosive bolt ability. He fires a bolt at a random player with his crossbow, and the bolt will soon explode, dealing fire damage to anyone near the player. The radius is marked with a red circle. It’s a good idea to not bunch up because of this.
- Unstable Construct likes to jump in the air and deal lots of AOE damage on the ground as he lands. This can be difficult to avoid, even though the AOE radius is small.
The Guardian Council

Level: 37
Health: 9,836 x 3
The Guardian Council is the sixth and last boss fight in Volenfell, and the first council style boss fight in ESO. You will face three dwarven centurions, and each of them has 9,836 Health and unique abilities:
- The Guardian’s Spark (the blue centurion)
- The Guardian’s Strength (the red centurion)
- The Guardian’s Soul (the yellow/green centurion)
The three centurions don’t strictly share their Health pool, but they have an ability which essentially means they will die roughly at the same time.
Boss mechanics
- The Guardian’s Spark is almost static throughout the encounter. He fires a lightning Mortar targeted at players. Small red circles will appear on the player’s location, expanding slightly in size. After a second or two the lightning mortat will hit the area and deal damage.
- The Guardian’s Soul has a frontal cone attack aimed at whoever is tanking him. It’s best if the tank picks him up and kites him.
- The Guardian’s Strength does a whirlwind attack around him non-stop. Any player could kite him.
- The yellow beam mechanic: you’ll notice that every now and then the centurions stop, and a yellow beam is cast between them. Whenever this happens, the health pools of the centurions are equalized. If one of the centurions was down to 10% Health, and the others were nearly full Health, the one with 10% would be healed up and the remaining two would lose Health. Even though it may seem like you’re not making progress because the centurion you focus on keeps “healing” up, you are taking down the overall health pool.
- It doesn’t really matter who you focus on, but the blue centurion is probably the easiest to damage because you can comfortably get close to him.